Java多线程原理与实例

本篇博客详细介绍Java多线程的基本原理与并发知识。参考博客https://github.com/CyC2018

线程状态

线程状态如下图所示,共有线程新建、可运行、阻塞、无限期等待、限期等待和终止五种状态。
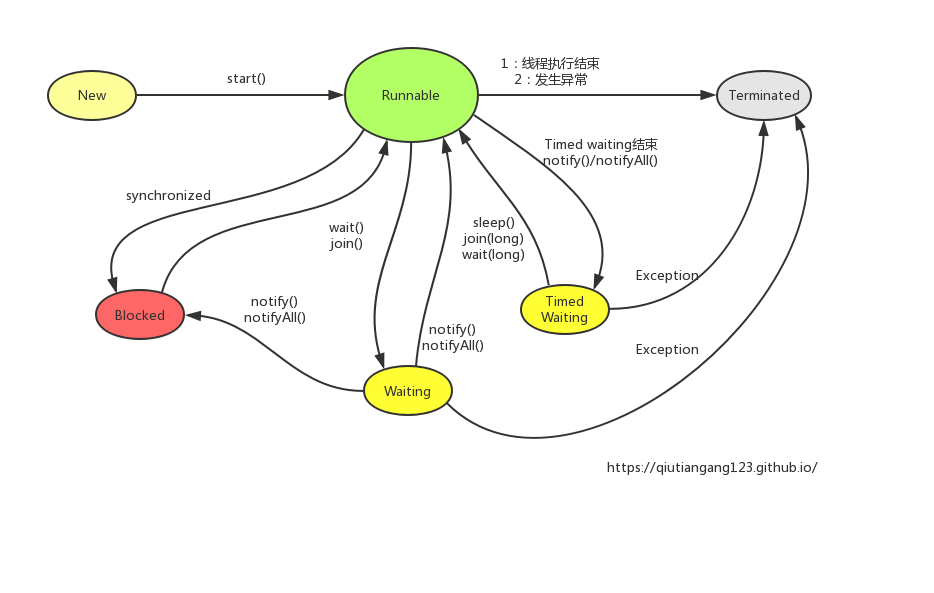
image-w100

新建(New)

线程的新建状态是指创建之后未使用。

可运行(Runnable)

线程的可运行状态指的是可能正在运行,也可能正在等待CPU时间片。

阻塞(Blocked)

等待获取排它锁,如果其他线程释放锁便会结束此状态。

无限期等待

等待其他线程显式的唤醒,否则不会分配时间片。

进入方法 退出方法
没有设置TImeout参数的Object.wait() Object().notify()和Object().notifyAll()
没有设置Timeout参数的Object.join() 被调用的线程执行完毕

限期等待

无需等待其他线程显示的唤醒,在一定时间之后会被系统自动的唤醒。

调用Thread.sleep()方法使线程进入限期等待状态,用“使一个线程睡眠”来进行描述。

调用Object.wait()方法是线程进入限期等待状态,用“使一个线程挂起”来进行描述。

睡眠和挂起用来描述行为,而阻塞和等待用来描述状态。

阻塞和等待的区别为,阻塞是被动的,它是等待获取一个排它锁,而等待是主动的。通常调用Thread.sleep()或者Object.wait()方法进入

进入方法 退出方法
使用Thread.sleep()方法 时间结束
设置Timeout参数的Thread.join()方法 时间结束/被调用的线程执行完毕
设置Timeout参数的Object.wait()方法 时间结束/Object.notify()/Object.notifyAll()

终止

线程执行完毕或者产生异常而结束。

线程的实现方法

有三种实现线程的方法

  1. 实现Runnable接口
  2. 实现Callable接口
  3. 继承Thread类

实现Runnable接口或者实现Callable接口的类只能当做可以在线程中运行的任务,而不是真正的线程。最后还需要Thread类来调用。

实现Runnable接口

1
2
3
4
5
6
7
8
9
10
11
12
13
14
15
16
public class AIMain {

public static void main(String[] args) {
MyRunnable instance = new MyRunnable();
Thread t = new Thread(instance);
t.start();
}

}

class MyRunnable implements Runnable{
@Override
public void run() {
System.out.println("创建线程");
}
}

实现Callable接口

与Runnable接口相比,Callable接口有返回值,返回值通过FutureTask进行封装。

1
2
3
4
5
6
7
8
9
10
11
12
13
14
15
16
17
18
19
20
public class AIMain {

public static void main(String[] args) throws InterruptedException, ExecutionException {
MyCallable instance = new MyCallable();
FutureTask<Integer> ft = new FutureTask<Integer>(instance);
Thread t = new Thread(ft);
t.start();
System.out.println(ft.get());
}

}

class MyCallable implements Callable<Integer>{

@Override
public Integer call() throws Exception {
return 123;
}

}

继承Thread类

1
2
3
4
5
6
7
8
9
10
11
12
13
14
public class AIMain {

public static void main(String[] args) {
MyThread t = new MyThread();
t.start();
}

}

class MyThread extends Thread {
public void run() {
System.out.println("创建线程");
}
}

线程之间的协作

当多个线程可以一起工作去解决某个问题时,如果某些部分必须在其他部分之前完成。那么就需要对线程进行协调。

join()

在线程中调用另一个线程join()方法,会将当前线程挂起,而不是忙等待,直到目标线程结束。

对于下面的程序来说,在线程B中,调用了a.join()方法,所以在执行时,即使B线程先执行,但是也要等线程a执行完毕之后再执行线程b。

1
2
3
4
5
6
7
8
9
10
11
12
13
14
15
16
17
18
19
20
21
22
23
24
25
26
27
28
29
30
31
32
33
34
35
36
public class AIMain {
public static void main(String[] args) {
JoinExample joinExample = new JoinExample();
joinExample.test();
}
}

class JoinExample {
private class A extends Thread {
public void run() {
System.out.println("A");
}
}

private class B extends Thread {
private A a;
B (A a) {
this.a = a;
}
public void run() {
try {
a.join();
} catch (InterruptedException e) {
e.printStackTrace();
}
System.out.println("B");
}
}

public void test() {
A a = new A();
B b = new B(a);
b.start();
a.start();
}
}

wait()、notify()和notifyAll()

调用wait()使得线程等待某个条件满足,线程在等待时会挂起,当其他线程运行使得这个条件满足时,其他线程会调用notify()或者notifyAll()来唤醒被挂起的线程。

它们都属于Object的一部分,而不属于Thread()。

使用wait()挂起期间,线程会释放锁。这是因为,如果没有释放锁,那么对象就无法进入同步方法或者同步控制块中,那么就无法执行notify()或者notifyAll()来唤醒挂起的线程,造成死锁。

1
2
3
4
5
6
7
8
9
10
11
12
13
14
15
16
17
18
19
20
21
22
23
24
public class AIMain {
public static void main(String[] args) {
ExecutorService executorService = Executors.newCachedThreadPool();
WaitNotifyExample we = new WaitNotifyExample();
executorService.execute(() -> we.after());
executorService.execute(() -> we.befor());
}
}

class WaitNotifyExample {
public synchronized void befor() {
System.out.println("before");
notifyAll();
}

public synchronized void after() {
try {
wait();
} catch (InterruptedException e) {
e.printStackTrace();
}
System.out.println("after");
}
}

实例说明

死锁代码

1
2
3
4
5
6
7
8
9
10
11
12
13
14
15
16
17
18
19
20
21
22
23
24
25
26
27
28
29
30
31
32
33
34
35
36
37
38
39
40
41
public class DeadLock {
private static String s1 = "s1";
private static String s2 = "s2";

public static void main(String[] args) {
// 线程a先锁住变量s1,然后锁住变量s1
Thread a = new Thread(() -> {
try {
while (true) {
synchronized(s1) {
System.out.println(Thread.currentThread().getName() + "锁住变量s1");
synchronized(s2) {
System.out.println(Thread.currentThread().getName() + "锁住变量s2");
}
}
}
} catch (Exception e) {
e.printStackTrace();
}
});

// 线程b先锁住变量s2,然后锁住变量s1
Thread b = new Thread(() -> {
try {
while (true) {
synchronized(s2) {
System.out.println(Thread.currentThread().getName() + "锁住变量s2");
synchronized(s1) {
System.out.println(Thread.currentThread().getName() + "锁住变量s1");
}
}
}
} catch (Exception e) {
e.printStackTrace();
}
});

a.start();
b.start();
}
}